|
In-depth Software Development InformationTwitter: @ericjbrunoEmail: eric@ericbruno.com |
Java Off-Heap In-Memory Database
Eric J. Bruno
I developed a basic storage solution for a previous project using Java’s MappedByteBuffer class coupled with a RandomAccessFile and Java NIO’s FileChannel. My goal was to store a potentially large amount of data within it. The advantages include: it’s fast, it uses no Java heap, the data is persisted, and it’s easy to use. Although the data was stored off heap, my original implementation used a Java HashMap as an index into the data, which consumed a large amount of heap when fully loaded. This became an issue.
I decided to enhance the implementation to use the same approach for the index, using a MappedByteBuffer instead of HashMap. I also enhanced both the data store and index to use the base class, ByteBuffer, which offers the option of creating an in-memory or persisted data store--all off the Java heap. Now, with a Java heap size constrained to be very small (say, 16 MB) I can create an in-memory, off-heap data store that holds gigabytes of data, or more.
Now there’s an additional advantage: while data writes and reads are fast because they’re in-memory, you don’t incur the cost of large garbage collection events and interference from a very large Java heap. You can effectively store terabytes of data in-memory (if you have the physical RAM) while maintaining a very small Java heap. Read on to learn how.
The java.nio.ByteBuffer class, based on the abstract java.nio.Buffer class, is intended to store values of primitive data types in memory within an array of bytes, with random access. You can write and read all primitive types except boolean, and it automatically converts values to be stored and retrieved as a sequence of bytes, respectively. Beyond primitive types, you can write and read arrays of bytes, which is useful when storing Strings or Java Objects that support serialization.
To ensure the highest performance with no impact to the Java heap, you can allocate memory for the ByteBuffer using the allocateDirect method. Although these buffers have higher allocation cost than non-direct buffers, reading and writing data with them is more efficient since it uses native OS I/O operations, outside of the garbage-collected heap.
ByteBuffer allows relative and absolute referencing, meaning you can write sets of values one after the other, and the class automatically updates the active position (where data gets written to) within the buffer after each call. Or you can specify the location to store and retrieve values with each call. Listing 1, for example, uses relative referencing to store a series of values.
Person person = new Person();
//…
ByteBuffer bb = ByteBuffer.allocateDirect(size);
bb.putInt(person.age);
bb.putFloat(person.weeklySalary);
bb.put(person.lastName.getBytes());
bb.put(person.firstName.getBytes());
bb.put((byte)(person.fullTime == true ? 1 : 0 ));
Listing 1 - Relative data writes to a ByteBuffer
With each write, the pointer to where to write data into the buffer next is updated automatically. Note that although a boolean value cannot be stored directly, you can encode it as a byte as shown in the last line of code in Listing 1. Retrieval follows the same pattern, as shown in Listing 2.
Person person = new Person();
Person.age = bb.getInt();
person.weeklySalary = bb.getFloat();
//...
Listing 2 - Relative data reads from a ByteBuffer
To read a sequence of values correctly, you need to know (and set) your starting position. Once there, you can read sequentially, relying on ByteBuffer to maintain the buffer position as you read. For instance, if you stored the values at the beginning of the ByteBuffer, you need to set the position back to the beginning with the following call:
bb.position(0); // Set the buffer position to the beginning
Note that reading the String values as stored is problematic. In order to read the correct number of bytes to be used as the String’s constructor, you also need to store the string length. Although this isn’t particularly difficult, as you write code to handle String data, boolean data, and tracking where sets of values are stored (records) you have the beginnings of an in-memory database. This is exactly why I created the NoHeapDB class, discussed later in this article. First, let’s dive into MappedByteBuffer and persistence.
ByteBuffer allows you to work with regions of bytes in memory to store and retrieve data. Its subclass, MappedByteBuffer, allows you to map regions of a file into memory as a ByteBuffer. As a result, when you write and read values to a MappedByteBuffer, they’re stored to, or read from, the on-disk file it’s mapped to. This persistence model has some benefits: it works the same as ByteBuffer (with random access, and relative and absolute positioning), but without the limitations of physical memory size. Additionally, it uses the underlying operating system for direct file and memory mapping, meaning you avoid large heaps and take advantage of the operating system’s highly-tuned internals for best performance.
To map a file to virtual memory and create a MappedByteBuffer, you need to call FileChannel.map. You can create a java.nio.FileChannel object in one of three ways (as shown in Listing 3):
// 1-Using RandomAccessFile
RandomAccessFile raFile =
new RandomAccessFile(path, "rw");
raFile.setLength(initialSize);
FileChannel fc = raFile.getChannel();
MappedByteBuffer mbb =
fc.map(FileChannel.MapMode.READ_WRITE,
0, // position
fc.size()); // size
// 2-Using File
File file = new File(path);
file.createNewFile();
FileInputStream fis = new FileInputStream(file);
FileChannel readChannel = fis.getChannel();
MappedByteBuffer readMap =
readChannel.map(FileChannel.MapMode.READ_ONLY,
0, // position
readChannel.size()); // size
// 3-Creating a FileChannel
FileChannel fc =
FileChannel.open( FileSystems.getDefault().getPath(path),
StandardOpenOption.WRITE,
StandardOpenOption.READ);
MappedByteBuffer mbb =
fc.map(FileChannel.MapMode.READ_WRITE,
0, // position
fc.size()); // size
Listing 3 - Creating a MappedByteBuffer object to map a file into memory
You then write and read to a MappedByteBuffer as you do a ByteBuffer. The difference is that the changes are persisted to the file that was originally mapped. Additionally, using the duplicate method, you can create multiple “views” into the original buffer’s content, but with separate buffer position, limit, and mark values. With these views, you can read and write to different locations within the same underlying content (file-based, in this case) concurrently from multiple threads, safely (see Listing 4). This allows for very high-throughput memory and file operations.
ByteBuffer bb = ByteBuffer.allocateDirect(10_000);
Runnable r = new Runnable() {
@Override
public void run() {
ByteBuffer localBB = bb.duplicate();
String name = Thread.currentThread().getName();
Integer threadNum = Integer.valueOf(name);
int start = threadNum * Long.BYTES;
localBB.position(start);
localBB.mark();
while ( true ) {
// Make sure the first digit is the thread number. This
// way when it's read and printed out, it will prove
// that each thread is writing to its own buffer position
// with no interference from the other threads
Long val = Long.valueOf(""+(threadNum+1)+System.nanoTime());
localBB.putLong(val);
localBB.reset();
Thread.yield();
}
}
};
int maxThreads = 12;
// Start the writer threads, where each writes to the buffer
for ( int t = 0; t < maxThreads; t++ ) {
Thread thread = new Thread(r);
thread.setName(""+t);
thread.start();
}
// read the values from the different parts of the buffer and
// output them over and over
while ( true ) {
for ( int t = 0; t < maxThreads; t++ ) {
bb.position(t*Long.BYTES);
Long val = bb.getLong();
System.out.print(val+", ");
}
System.out.println();
Thread.yield();
}
Listing 4 - Using ByteBuffer.duplicate, multiple threads can safely operate on a single buffer
Just to illustrate, this code duplicates the single ByteBuffer (or MappedByteBuffer) for each thread. A set of threads are created to each write to a different different region of the buffer, and a second set of reader threads are created. Each writer thread prepends its thread number to the values it writes to the buffer as a Long, which you can see when the reader threads output the latest values.
When storing data in an array of bytes (mapped to a persistent file store or not) you need to manage the data in order to easily locate it. You can write the data as an ordered list or as an array of same-size data, and simply iterate through. But typically you’ll need a more flexible and more-efficient lookup method. The NoHeapDBStore class does this--NoHeapDB is a facade class--by storing data that can be iterated, and leveraging a hashtable as an index for O(1) lookup of data by key. This index is implemented in the FixedHash class, which we’ll cover here as well.
To use NoHeapDBStore, you create a “data store” as you would a table in an SQL database. You need to provide a name, an initial size, and a storage type (to indicate persistence or in-memory only). The defaults are 100MB starting size, and in-memory persistence for all data. You can optionally specify a home directory for all persisted data stores. Each store is represented as an instance of the NoHeapDBStore class, and the raw data is held in the member variable, buffer, as type ByteBuffer.
An in-memory data store is created via the createMessageJournalBB method. The memory is allocated with ByteBuffer.allocateDirect, which requests the JVM to use native memory (not the Java heap) as the backing store for the buffer. What you do with the bytes within this buffer is not subject to garbage collection (although the entire ByteBuffer will be garbage collected when there are no more references to it, as with any Java Object).
In general, nothing is wrong with automatic memory management, known better as garbage collection (GC). Although GC has improved with every release of the JVM, collection events on large heaps (many gigabytes or even terabytes in size) can still interfere with application thread execution when they occur. For certain types of applications, such as those with real-time requirements, this can cause critical errors. Keeping data in-memory but off the Java heap with this approach translates into high-speed data access without GC interference.
The persistent store is created via the createMessageJournalMBB method, and is a bit more involved (see Listing 5).
protected final boolean createMessageJournalMBB(String journalPath) {
try {
// First create the directory and file within
File filePath = new File(journalFolder);
filePath.mkdir();
File file = new File(journalPath);
fileExists = file.exists();
journal = new RandomAccessFile(journalPath, "rw");
if ( fileExists ) {
// Existing file, so use its existing length
bufferSize = (int)journal.length();
} else {
// New file, set the starting length
journal.setLength(bufferSize);
}
channel = journal.getChannel();
buffer = channel.map(FileChannel.MapMode.READ_WRITE, 0, bufferSize);
if ( ! fileExists) {
// New journal file. Write the file header data
writeJournalHeader(journal);
currentEnd = journal.getFilePointer();
} else {
// Iterate through the existing records and find its current end
currentEnd = scanJournal();
}
}
catch (Exception e) {
logger.log(Level.SEVERE, "createMessageJournalMBB Exception: ", e);
}
return false;
}
Listing 5 - Creating a persistent store RandomAccessFile, FileChannel, and MappedByteBuffer
First, the file’s base directory is created. Next, the file itself is created using the store name, and then a RandomAccessFile read/write stream (called a journal in the code) is created using that file. If the file exists, the length of the file is retrieved, otherwise the file size is set to the default initial store size. Finally, a read/write MappedByteBuffer is created by mapping the journal’s FileChannel. Some file header data is written consisting of the journal’s name and the version of the file format for future compatibility. Existing data store journal files (from previous executions) are scanned for active records, which are each indexed for fast retrieval via the scanJournal method.
Each data store holds a set of records, where each is marked as active or inactive. Inactive records are those that have been deleted; they’re simply marked as such and their locations can be reused at a later time. However, for fast O(1) record retrieval, a hash table index is created that allows you to store and retrieve data as name-value pairs. The index for this implementation is a fixed-size hash table (as opposed to an extendible hash). However, the fixed-size hash will actually grow when its loading factor reaches a threshold.
The index is created as a ByteBuffer for in-memory stores, and as a MappedByteBuffer from a RandomAccessFile for persistent stores. Its starting size is ¼ the size of the data store, or 64MB minimum. This is typically large enough considering the index stores only the hashed version of the key, and the location of the record itself within the data store.
You have a choice, however: you can store the original key within the index, or the hashed version (since that’s what’s actually used to find a bucket to store the record location). Since it’s smaller, storing the hash value (a four-byte Integer) is faster and more compact than a String-based key.
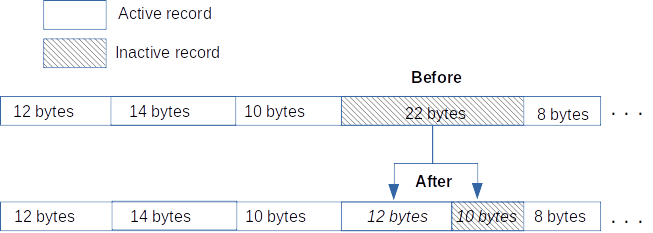
The structure of the Data Store buffer (in-memory or persisted) is such that all records are contiguous. Along with the data, each record contains the record’s size in bytes, its type, and a flag to indicate if it’s active (not-deleted). As a result, records can be traversed consecutively. When a record is deleted, it’s simply marked as deleted. This means that new records can be appended to the end of the list of records, or inserted in place of an inactive record if there is one, and if it fits exactly. If the new record is smaller, the inactive record is split into a space big enough to hold the new record and a smaller, inactive record (see Figure 1).
Figure 1 - Inserting a 12-byte record in a deleted record’s location.
The inactive record to be reclaimed needs to be large enough for both the new record (data and record header) and at least another header for the remaining, inactive, record space. More on this process later.
Analogous to the ByteBuffer base class, NoHeapDB supports data storage via a series of putX methods:
Each method accepts a key as a String and the value itself, and each one calls the private putVal method where the actual implementation exists. First, the data length is determined, based on the data type. Next, the location for the new record is determined. This process is performed in the method setNewRecordLocation which, in conjunction with getStorageLocation (see Listing 6), finds a free (inactive) slot to reclaim with the new record. If none are found, it appends the new record to the end of the buffer.
// Is there an exact match?
LinkedList<Long> records = emptyIdx.get(recordLength);
if (records != null && !records.isEmpty()) {
location.offset = records.remove();
// No need to append an empty record, just return offset
location.newEmptyRecordSize = -1;
return location;
}
// Store empty record slots to be removed
ArrayList<Integer> toRemove = new ArrayList<>();
// No exact size match, find one just large enough
for (Integer size : this.emptyIdx.keySet()) {
// Enough room for the new record and another empty
// record with a header and at least one byte of data?
if (size >= recordLength + Header.HEADER_SIZE + 1) {
records = emptyIdx.get(size);
if (records == null || records.size() == 0) {
// This was the last empty record of this size
// so delete the entry in the index and continue
// searching for a larger empty region (if any)
toRemove.add(size);
continue;
}
location.offset = records.remove();
// We need to append an empty record after the new record
// taking the size of the header into account
location.newEmptyRecordSize =
size - recordLength - Header.HEADER_SIZE;
int newOffset = (int)
location.offset + recordLength + Header.HEADER_SIZE;
// Store the new empty record's offset
storeEmptyRecord( newOffset, location.newEmptyRecordSize );
break;
}
}
Listing 6 - Searching for a free slot to insert a new record
All inactive record locations are stored in an ArrayList sorted in ascending order by size. To be accurate, each ArrayList entry is a LinkedList of inactive record locations of that size. First, a check is made to find an inactive record of the exact size of the new record, in which case it can be used wholesale. Since the ArrayList is sorted by size, simply call get with the new record size, and that location is removed from the “empty” list and is returned.
If an exact match isn’t found, then the list is traversed until one just large enough to contain it is found, along with an additional empty record (to maintain the contiguous list of records). The reclaimed inactive slot is removed from the empty list, and the new inactive slot (the result of splitting the original one for reuse) is added back to it according to its new size.
Technically, this act of marking and reusing deleted records is a form of garbage collection. Additionally, its processing time can vary based on the number of inactive records traversed. In that sense it’s also unpredictable. However, its processing cost is spread across the act of storing new records and, to a lesser extent, removing existing records. As a result, the impact is limited, and it’s something you as a developer can control. For example, ensuring you don’t modify a Data Store in any way when in a time-critical portion of your application also ensures this processing doesn’t occur.
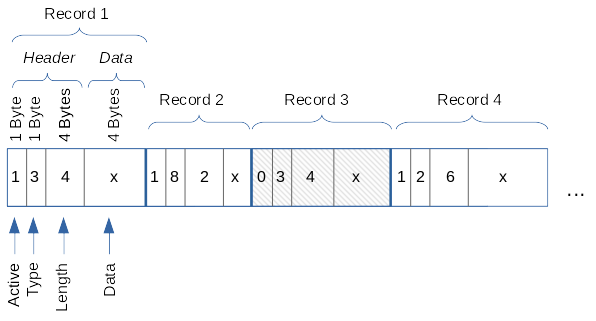
Finally, the data record is stored within the buffer (see Listing 7). The record header consists of a byte indicating the record is active (not deleted), the data type (a byte), and the data length (four bytes). After that, the data value is written to the buffer.
// First write the record header
buffer.put(ACTIVE_RECORD); // 1 byte
buffer.put(type); // 1 byte
buffer.putInt(datalen); // 4 bytes
// Write record value
switch ( type ) {
case LONG_RECORD_TYPE:
buffer.putLong( (Long)val );
break;
case INT_RECORD_TYPE:
buffer.putInt( (Integer)val );
break;
case DOUBLE_RECORD_TYPE:
buffer.putDouble( (Double)val );
break;
case FLOAT_RECORD_TYPE:
buffer.putFloat( (Float)val );
break;
case SHORT_RECORD_TYPE:
buffer.putShort( (Short)val );
break;
case CHAR_RECORD_TYPE:
buffer.putChar( (char)val );
break;
case TEXT_RECORD_TYPE:
buffer.put( ((String)val).getBytes() );
break;
case BYTEARRAY_RECORD_TYPE:
buffer.put( (byte[])val );
break;
}
Listing 7 - Storing the data record within the Data Store
The last step is to index the new record for fast retrieval. The FixedHash.put method takes the record’s key and offset within the Data Store, and first finds a hash table bucket using the key. It then positions itself to that location (bucket) in the hash table and checks to see if it’s already occupied.
Note: The code seeks to the offset by calling ByteBuffer.position, then calls mark to save the location. Next, calling ByteBuffer.get advances the file position by a byte and reads the value; the “occupied” indicator. If the bucket is free, a call to reset moves the file position back to the bucket start position. Alternatively, calling get with the location as a parameter will read the value without moving the file position. However, I found the sequence of calling mark and reset to be, surprisingly, faster overall (see Listing 8).
If the bucket is free, the key length, the key hash code, and the record offset value are each written to the index buffer. Optionally, you can have the index store the original key as well, but I found it slows things down, takes up more room in the buffer, and all you really need is the key’s hash code to locate it. If you prefer to store the key, set the KEY_SIZE value to something greater than 0 so it knows how many bytes to copy.
offset = getHashBucket(key.hashCode() );
indexBuffer.position(offset);
indexBuffer.mark();
byte occupied = indexBuffer.get();
if ( occupied == 0 ) {
// found a free slot, go back to the beginning of it
indexBuffer.reset();
}
else {
collisions++;
offset = findBucket(key, offset, false);
// found a free slot, seek to it
indexBuffer.position(offset);
}
// Write the data
//
indexBuffer.put((byte)key.length() );
indexBuffer.putInt(key.hashCode());
// hashcode is faster for resolving collisions then comparing strings
if ( KEY_SIZE > 0 ) {
byte[] fixedKeyBytes = new byte[KEY_SIZE];
System.arraycopy(key.getBytes(),
0, fixedKeyBytes,
0, key.length());
indexBuffer.put( fixedKeyBytes );
}
indexBuffer.putLong( value ); // indexed record location
Listing 8 - Indexing data records by storing the key in a hash table for O(1) lookup
If there’s a collision, findBucket (see Listing 9) is called to iterate through the table to find the next empty hash bucket. If the collision is because the key already exists in the index, the location is reused -- adding a new value with the same key replaces the previous value. If not, then the table is iterated bucket by bucket until a free one is found.
while ( occupied > 0 && ! found) {
int keyHash = indexBuffer.getInt();
if ( keyHash == key.hashCode() ) {
if ( KEY_SIZE > 0 ) {
indexBuffer.position(
offset + 1 + Integer.BYTES + KEY_SIZE );
}
found = true;
break;
}
else {
// Check for rollover past the end of the table
offset += INDEX_ENTRY_SIZE_BYTES;
if ( offset >= (sizeInBytes - INDEX_ENTRY_SIZE_BYTES)) {
// Wrap to the beginning, skipping the first bucket
// since it's reserved for the first record pointer
offset = INDEX_ENTRY_SIZE_BYTES;
}
// Skip to the next bucket
indexBuffer.position(offset);
occupied = indexBuffer.get();
}
}
Listing 9 - The method findBucket locates the next empty bucket after a collision
Since each index entry is the same number of bytes, it’s a simple matter of calling ByteBuffer.position to advance that many bytes in the buffer. A check is made to see if the end of the buffer is reached, and if so, the code wraps around to the beginning.
Now that we’ve explored how records are stored in the Data Store and then indexed, it’s time to dive into data retrieval. Just as there are a series of putX methods for each primitive data type, there’s a series of getX methods for retrieval:
Each method accepts a key as a String and returns the appropriate data type. Each one calls the private getVal method where the actual implementation exists (see Listing 10). First, a call is made to retrieve the record location for the given key using the index. If not found in the index, null is returned.
Long offset = index.get(key);
//...
// Jump to this record's offset within the journal file
buffer.position(offset.intValue());
// First, read in the header
byte active = buffer.get();
if (active != 1) {
return null;
}
byte type = buffer.get();
int dataLength = buffer.getInt();
// Next, read in the data
byte[] bytes;
switch ( type ) {
case LONG_RECORD_TYPE:
val = buffer.getLong();
break;
case INT_RECORD_TYPE:
val = buffer.getInt();
break;
case DOUBLE_RECORD_TYPE:
val = buffer.getDouble();
break;
case FLOAT_RECORD_TYPE:
val = buffer.getFloat();
break;
case SHORT_RECORD_TYPE:
val = buffer.getShort();
break;
case CHAR_RECORD_TYPE:
val = buffer.getChar();
break;
case BYTEARRAY_RECORD_TYPE:
bytes = new byte[dataLength];
buffer.get(bytes);
val = bytes;
break;
case TEXT_RECORD_TYPE:
bytes = new byte[dataLength];
buffer.get(bytes);
val = new String(bytes);
break;
}
Listing 10 - Retrieving a data record from the Data Store
If found, the file position is set to the returned offset (from the index). Next, the active record indicator byte is read. If active, the record’s data type and and length are read as a byte and Integer, respectively. Finally, the record’s data is read according to its type and, only in the case of a String or byte array, its length. Let’s back up and examine how the index lookup found the record’s location (Listing 11).
public Long get(String key) {
int bucketOffset = getHashBucket( key.hashCode() );
indexBuffer.position(bucketOffset);
byte occupied = indexBuffer.get();
if ( occupied > 0 ) {
bucketOffset = findBucket(key, offset, true);
}
if ( bucketOffset == -1 ) {
// Record not found
return -1L;
}
// Return the location of the data record
return indexBuffer.getLong();
}
Listing 11 - Loading the record location from the index
First, the bucket within the index is located by hashing the key. The buffer is positioned to the returned offset and a byte is read (the occupied flag). If the bucket is marked as occupied, findBucket (from Listing 9) is called to determine if this is indeed the record’s hash bucket. It does this by comparing the keys, and iterating until either the key is found, or an empty bucket is encountered (indicating this key isn’t in the index). Finally, if found, the record’s location within the Data Store is read from the index as a Long value and returned.
Removing records from the Data Store is straightforward (see Listing 12). A quick lookup in the index determines if the record exists and returns its location if it does.
// Locate the message in the journal
offset = getRecordOffset(key);
if (offset == -1) {
return false;
}
// read the header (to get record length) then set it as inactive
buffer.position(offset.intValue());
buffer.put(INACTIVE_RECORD);
buffer.put(EMPTY_RECORD_TYPE);
datalength = buffer.getInt();
// Store the empty record location and size for later reuse
storeEmptyRecord(offset, datalength);
// Remove from the journal index
index.remove( key );
Listing 12 - Removing a record from the Data Store
The buffer position is set to the start of the record, and the first byte is set to denote that the record is inactive, and the record type is set to indicate the slot is empty. The record’s location in the buffer and its length are then added to the empty record list, ready to be reclaimed when new records are added to the Data Store.
Finally, the index entry for this record is removed as well. That process is also straightforward: the key’s hash bucket is located. If the bucket is occupied, a collision check is made using findBucket (Listing 9), just as with record retrieval. If the key is indeed found, the bucket’s first byte (the occupied flag) is set to 0, indicating it’s no longer occupied.
We’ve covered record retrieval by key, but you can also iterate through all of the records in the Data Store. Starting from the beginning of the buffer (see Figure 2) each record’s active byte, data type, and length are read. If the record is active, it’s returned. If it’s not active, the record location is skipped and the next record is checked, and so on.
Figure 2 - Sample record structure within a Data Store.
Iteration begins by seeking to the beginning of the buffer (and skipping past the file header if it’s a persisted Data Store) in the method iterateStart, then searching for the next active record by calling getNextRecord (see Listing 13). The position to begin searching is passed as a parameter.
while ( !found && current < (bufferSize - Header.HEADER_SIZE)) {
boolean active = true;
if (buffer.get() == INACTIVE_RECORD) {
active = false;
}
// Read record type
type = buffer.get();
if (type == EMPTY_RECORD_TYPE) {
buffer.position((int)currentEnd);
break; // end of data records in file
}
// Get the data length
int datalen = buffer.getInt();
recordSize = Header.HEADER_SIZE + datalen;
if ( active) {
// Found the next active record
found = true;
// Store the location to the start of the next record
iterateNext = current + recordSize;
}
else {
// skip past the data to the beginning of the next record
current += recordSize;
buffer.position( (int)current );
}
}
if ( found ) {
// Return the record
return getValue(current, type);
}
Listing 13 - Getting the next active record while iterating through the Data Store
The code loops until an active record is found, or the end of the file is reached. First, the active record byte is read, followed by the data type and data length. If the record is inactive, using this record’s data length, the buffer pointer is advanced to the next record. If the record is active, the flag is set to end the loop, and the record’s value is retrieved and returned. The location of the next record is stored and used when the iterateNext method is called. This way you can repeatedly call iterateNext until a null is returned, indicating no more records, as shown here:
Object recordObj = iterateStart();
while ( recordObj != null ) {
// Do something with the returned record
...
// Get the next record in the Data Store
recordObj = iterateNext();
}
You can optionally specify the starting size of the Data Store buffer (which also determines the index size), otherwise it defaults to 100MB. The buffer will be automatically expanded in 100MB increments as it fills. However, if you have an idea of the amount of storage you’ll need, it’s more efficient to size the Data Store accordingly.
The code to expand the Data Store differs for n-memory or persisted buffers. Listing 14 shows the in-memory version.
ByteBuffer newBuffer = ByteBuffer.allocateDirect((int)newLength);
if ( buffer.hasArray() ) {
byte[] array = buffer.array();
newBuffer.put( array );
}
else {
buffer.position(0);
newBuffer.put(buffer);
}
buffer = newBuffer;
journalLen = buffer.capacity();
Listing 14 - Expanding the in-memory Data Store.
The index is sized to be one-quarter the starting size of the Data Store, and it’s also automatically expanded (and re-hashed) when it passes a load threshold (75% by default).
To use the off-heap Data Store (download all of the code here), create an instance of the NoHeapDB class, which is essentially the API for all operations. Due to limitations of Java’s ByteBuffer class, you cannot create a single Data Store larger than a signed four-byte integer maximum value (2,147,483,647 bytes, or 2GB). To work around this limitation, you can create multiple Data Stores, and subdivide your data between them. (Alternatively, you could extend the implementation of the NoHeapDBStore class to create an array of ByteBuffer objects to work in aggregation, encapsulated and hidden from users of the class.)
The NoHeapDB class contains the Data Store API, and it has two constructors. One takes a String to denote where the Data Store backing files should be written to. Otherwise the default is the user’s home directory. In either case, a directory named JavaOffHeap is created, which will contain the files for each persisted Data Store: one for the data, and one for the index.
There are three createDataStore methods; the first takes a name, the second takes a name and a type (IN_MEMORY or PERSISTED), the third takes a name, type, and starting size in megabytes. The default type is IN_MEMORY, and the default starting size is 100MB. Remember that the data store will grow in 100MB increments as needed.
NoHeapDB db = new NoHeapDB();
db.createStore(
"MyTestDataStore",
DataStore.Storage.IN_MEMORY, //or DataStore.Storage.PERSISTED
256); // in MB
To insert data, call one of the putX methods. You can continue referring to Data Stores by name. Alternatively you can get a reference to the internal DataStore implementation and call methods directly on it. Its API matches that of ByteBuffer also.
String key = ...;
String value = ...;
db.putString("MyTestDataStore", key, value);
// or
Integer intValue = ...;
DataStore store = db.getStore("MyTestDataStore");
store.putInteger(key, intValue);
Retrieving data is just as easy. Call one of the getX methods as appropriate, providing a key for lookup. If the value isn’t found, null is returned.
Integer intValue = db.getInteger("MyTestDataStore", key);
// or
DataStore store = db.getStore("MyTestDataStore");
intValue = store.getInteger(key);
Call the remove method to remove a data value entry, providing the value’s key.
String key = ...;
db.remove("MyTestDataStore", key);
// or
DataStore store = db.getStore("MyTestDataStore");
store.remove(key);
To iterate through the entries in a Data Store without using keys, call iterateStart to begin, and repeatedly call iterateNext until a null is returned. If there are no values in the Data Store, iterateStart will return null.
Object val = db.iterateStart("MyTestDataStore");
while ( val != null ) {
// do something with val
// ...
val = db.iterateNext("MyTestDataStore");
}
You can delete an entire Data Store (remove all of its entries and delete its backing data file if it was created as a PERSISTED store) by calling deleteStore.
db.deleteStore("MyTestDataStore");
The benefits of the NoHeapDB implementation are clear:
This implementation can be taken even further. Here are a few examples of potential improvements:
These are just some of the enhancements I’m working on. You can download the current implementation of the NoHeapDB store here, and be sure to look for updates as time goes by.
 eric@ericbruno.com